- Bạn xem hình ví dụ dưới đây về Spinner:

- Ví dụ trên làm rất đơn giản, bạn chỉ việc kéo 2 control: TextView và Spinner vào ứng dụng (xem activity_spinner.xml):
1
2
3
4
5
6
7
8
9
10
11
12
13
14
15
16
17
18
19
| android:id="@+id/LinearLayout1" android:layout_width="match_parent" android:layout_height="match_parent" android:orientation="vertical" tools:context=".SpinnerActivity" > <TextView android:id="@+id/selection" android:layout_width="match_parent" android:layout_height="wrap_content" android:background="#007380" android:hint="selected here" android:textColor="#ff003c" /> <Spinner android:id="@+id/spinner1" android:layout_width="match_parent" android:layout_height="wrap_content" /></LinearLayout> |
- Ở đây Tôi đặt Id cho spinner là spinner1 (nhìn dòng lệnh 16).
- Coding SpinnerActivity.java:
1
2
3
4
5
6
7
8
9
10
11
12
13
14
15
16
17
18
19
20
21
22
23
24
25
26
27
28
29
30
31
32
33
34
35
36
37
38
39
40
41
42
43
44
45
46
47
48
49
50
51
52
53
54
55
56
57
58
| package tranduythanh.com;import android.os.Bundle;import android.app.Activity;import android.view.View;import android.widget.AdapterView;import android.widget.AdapterView.OnItemSelectedListener;import android.widget.ArrayAdapter;import android.widget.Spinner;import android.widget.TextView;public class SpinnerActivity extends Activity {//Tạo một mảng dữ liệu giả String arr[]={ "Hàng điện tử", "Hàng hóa chất", "Hàng gia dụng"}; TextView selection; @Override protected void onCreate(Bundle savedInstanceState) { super.onCreate(savedInstanceState); setContentView(R.layout.activity_spinner); selection =(TextView) findViewById(R.id.selection); //Lấy đối tượng Spinner ra Spinner spin=(Spinner) findViewById(R.id.spinner1); //Gán Data source (arr) vào Adapter ArrayAdapter<String> adapter=new ArrayAdapter<String> ( this, android.R.layout.simple_spinner_item, arr ); //phải gọi lệnh này để hiển thị danh sách cho Spinner adapter.setDropDownViewResource (android.R.layout.simple_list_item_single_choice); //Thiết lập adapter cho Spinner spin.setAdapter(adapter); //thiết lập sự kiện chọn phần tử cho Spinner spin.setOnItemSelectedListener(new MyProcessEvent()); } //Class tạo sự kiện private class MyProcessEvent implements OnItemSelectedListener { //Khi có chọn lựa thì vào hàm này public void onItemSelected(AdapterView<?> arg0, View arg1, int arg2, long arg3) { //arg2 là phần tử được chọn trong data source selection.setText(arr[arg2]); } //Nếu không chọn gì cả public void onNothingSelected(AdapterView<?> arg0) { selection.setText(""); } }} |
- Bạn xem Tôi giải thích dưới này:
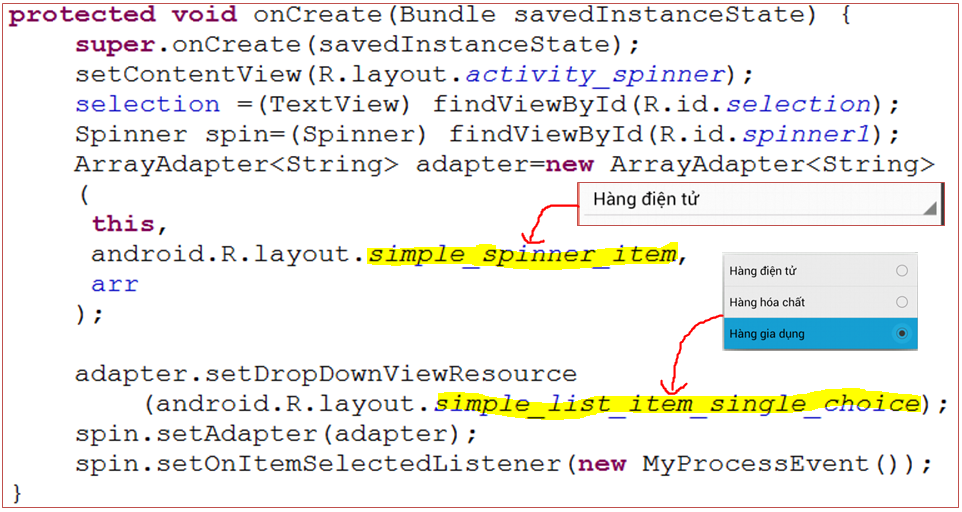
- Bạn thấy đó android.R.layout.simple_spinner_item dùng để hiển thị phần tử bạn chọn lên spinner. Tương tự như trong ListView bạn có thể custom lại
- Dòng lệnh dưới: android.R.layout.simple_list_item_single_choice để hiện thị danh sách các phần tử trong Spinner khi bạn nhấn vào xem Spinner. Bạn phải gọi hàmsetDropDownViewResource nếu không nó sẽ lỗi chương trình khi bạn nhấn vào xem. Bạn có thể dùng layout khác nhau, chẳng hạn bạn có thể thay thế bằng : android.R.layout.simple_spinner_dropdown_item
- Như vậy bạn đã làm quen được với Spinner, bạn có thể load code mẫu ở đây: http://www.mediafire.com/?1pmikmscb30po3s
- Ban đầu Tôi tính kết hợp ListView và Spinner trong bài tập này luôn, nhưng vì thấy nó hơi phức tạp nên Tôi đã tách ra một bài tập thực hành riêng, trong bài tập tới bạn sẽ học phần này.
- Chúc bạn thành công
0 nhận xét:
Đăng nhận xét