Cấu hình ngôn ngữ trong Android (bạn từ mò), Tôi chụp màn hình bên trong để chọn ngôn ngữ:

- Tôi có ví dụ về 4 mùa trong năm: xuân, hạ , thu ,đông:
- Khi Setting trong Android là tiếng Anh:
 - Tiếng Pháp:
 - Tiếng việt:
 - Bạn chú ý là các hình trên Tôi hoàn toàn không sửa đổi coding, Tôi chỉ đổi ngôn ngữ trong Android, nó tự động tải đúng Resource XML ngôn ngữ.
- Cách tạo Resource XML ngôn ngữ:
- Cần chú ý: tất cả các string resource id ở các ngôn ngữ khác nhau đều phải có cùng id.
- Mỗi một Quốc gia sẽ có một Code riêng với 2 ký tự:
- Bạn chú ý là các hình trên Tôi hoàn toàn không sửa đổi coding, Tôi chỉ đổi ngôn ngữ trong Android, nó tự động tải đúng Resource XML ngôn ngữ.
- Cách tạo Resource XML ngôn ngữ:
- Cần chú ý: tất cả các string resource id ở các ngôn ngữ khác nhau đều phải có cùng id.
- Mỗi một Quốc gia sẽ có một Code riêng với 2 ký tự:
 -Bấm chuột phải vào Android Project/ chọn Android XML resource:
- Màn hình trên hiển thị ra. Bạn chọn vào mục Language rồi click biểu tượng số 1.
- Language sẽ hiển thị vào danh sách ở giữa
- ở mục số 2 bạn chọn Code Quốc gia (theo ngôn ngữ)
- Mục Folder ở số 3 sẽ được nối kèm ở đằng sau values.
- Bạn xem cấu trúc thư mục của Android Project sau khi bạn chọn ngôn ngữ xong (ở đây là tiếng anh, tiếng pháp, tiếng việt):
-Bấm chuột phải vào Android Project/ chọn Android XML resource:
- Màn hình trên hiển thị ra. Bạn chọn vào mục Language rồi click biểu tượng số 1.
- Language sẽ hiển thị vào danh sách ở giữa
- ở mục số 2 bạn chọn Code Quốc gia (theo ngôn ngữ)
- Mục Folder ở số 3 sẽ được nối kèm ở đằng sau values.
- Bạn xem cấu trúc thư mục của Android Project sau khi bạn chọn ngôn ngữ xong (ở đây là tiếng anh, tiếng pháp, tiếng việt):
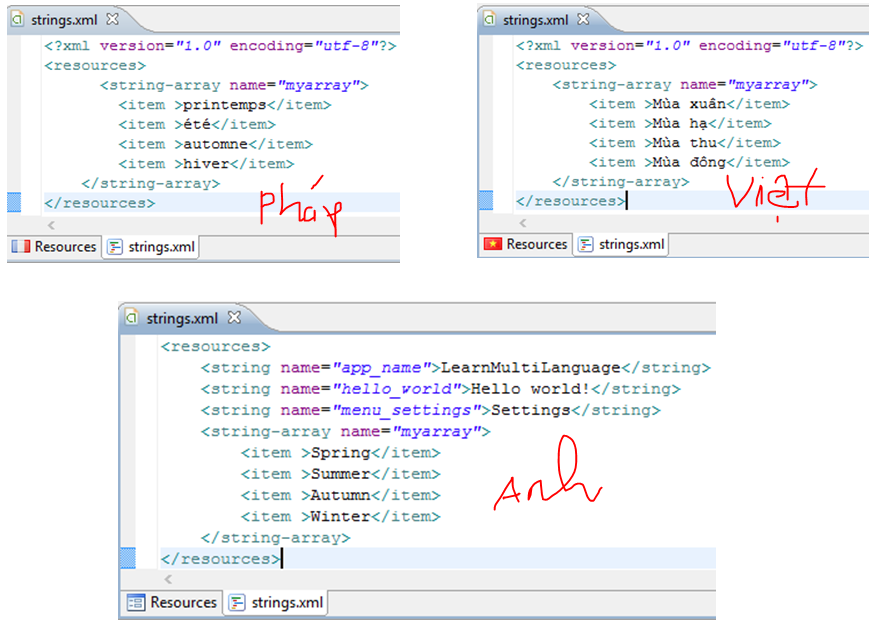
 -Bạn xem 3 tập tin strings.xml ở 3 ngôn ngữ khác nhau (nhớ là phải cùng id):
 - Xem XML layout:
1
2
3
4
5
6
7
8
9
10
11
12
13
14
15
16
17
18
19
20
android:id="@+id/LinearLayout1"
android:layout_width="match_parent"
android:layout_height="match_parent"
android:orientation="vertical"
tools:context=".MainActivity" >
<TextView
android:id="@+id/textView1"
android:layout_width="match_parent"
android:layout_height="wrap_content"
android:background="#80FFFF" />
<ListView
android:id="@+id/listView1"
android:layout_width="match_parent"
android:layout_height="wrap_content" >
</ListView>
</LinearLayout>
- Xem coding:
1
2
3
4
5
6
7
8
9
10
11
12
13
14
15
16
17
18
19
20
21
22
23
24
25
package tranduythanh.com;
import android.os.Bundle;
import android.app.Activity;
import android.view.Menu;
import android.widget.ArrayAdapter;
import android.widget.ListView;
public class MainActivity extends Activity {
protected void onCreate(Bundle savedInstanceState) {
super.onCreate(savedInstanceState);
setContentView(R.layout.activity_main);
ListView lv=(ListView) findViewById(R.id.listView1);
ArrayAdapter<String>adapter=new ArrayAdapter<String>
(this,android.R.layout.simple_list_item_1,
getResources().getStringArray(R.array.myarray));
lv.setAdapter(adapter);
}
@Override
public boolean onCreateOptionsMenu(Menu menu) {
// Inflate the menu; this adds items to the action bar if it is present.
getMenuInflater().inflate(R.menu.activity_main, menu);
return true;
}
}
- Bạn tải coding mẫu ở đây: http://www.mediafire.com/?owbph611tqxtt50

 - Tiếng Pháp:
 - Tiếng việt:
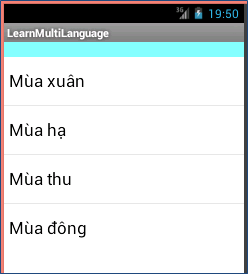 - Bạn chú ý là các hình trên Tôi hoàn toàn không sửa đổi coding, Tôi chỉ đổi ngôn ngữ trong Android, nó tự động tải đúng Resource XML ngôn ngữ.
 -Bấm chuột phải vào Android Project/ chọn Android XML resource:
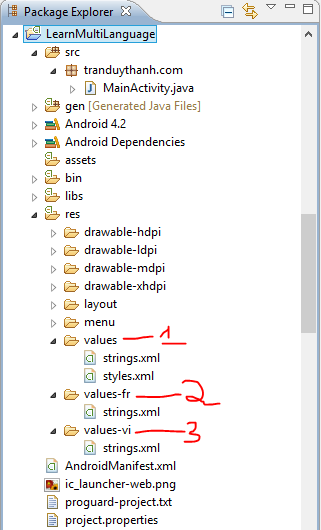
1
2
3
4
5
6
7
8
9
10
11
12
13
14
15
16
17
18
19
20
| android:id="@+id/LinearLayout1" android:layout_width="match_parent" android:layout_height="match_parent" android:orientation="vertical" tools:context=".MainActivity" > <TextView android:id="@+id/textView1" android:layout_width="match_parent" android:layout_height="wrap_content" android:background="#80FFFF" /><ListView android:id="@+id/listView1" android:layout_width="match_parent" android:layout_height="wrap_content" > </ListView></LinearLayout> |
1
2
3
4
5
6
7
8
9
10
11
12
13
14
15
16
17
18
19
20
21
22
23
24
25
| package tranduythanh.com;import android.os.Bundle;import android.app.Activity;import android.view.Menu;import android.widget.ArrayAdapter;import android.widget.ListView;public class MainActivity extends Activity { protected void onCreate(Bundle savedInstanceState) { super.onCreate(savedInstanceState); setContentView(R.layout.activity_main); ListView lv=(ListView) findViewById(R.id.listView1); ArrayAdapter<String>adapter=new ArrayAdapter<String> (this,android.R.layout.simple_list_item_1, getResources().getStringArray(R.array.myarray)); lv.setAdapter(adapter); } @Override public boolean onCreateOptionsMenu(Menu menu) { // Inflate the menu; this adds items to the action bar if it is present. getMenuInflater().inflate(R.menu.activity_main, menu); return true; }} |
Tại sao bạn copy toàn bộ nội dung bên https://duythanhcse.wordpress.com/android/ mà không ghi rõ nguồn vậy?
Trả lờiXóa